How-To’s

How-To’s Guides

Download Plugin Here

Add From Server

The heart of a CMS is the ability to upload and insert content, WordPress does a fantastic job at this, unfortunately, some web hosts have limited servers, or users simply do not have the ability to upload large files through their web browser. Add From Server is designed to help ease this pain, You can upload a bunch of files via FTP (Or your favourite transmission method) and simply import those files from the webserver directly into WordPress.

Screenshots

  1. add-from-server screenshot 1The import manager, This allows you to select which files to import. Note that files which cannot be imported are Red.
  2. add-from-server screenshot 2The Options panel, This allows you to specify what users can access Add From Server, and which folders users can import files from.

Recent Changes

3.3.1

  • Fix plugin activation

3.3

Original Post here

 “Could Not Build the Crop Preview Because of a Program Error.”

While running Adobe Photoshop CS6 all of the sudden I got an error when trying to crop an image…“Could not build the Crop preview because of a program error.” I have been cropping images for 5 months and never received this error before. Follow the steps below to fix.

photoshop-crop-error

Step 1

Launch Adobe Photoshop CS6 and click on the Crop Tool on the left hand side.

photoshop-cs6-crop-tool

Step 2

On the top left, reset the crop ratio in the drop down to “Original Ratio.” This somehow resets the crop tool.

adobe-photoshop-crop-ratio

You should now be able to crop again.

Step 3

You will probably want to then set it back to “Unconstrained.”

CS6 so far has been the buggiest version of Adobe Creative Suite to date.

Especially if you are running on an ATI GPU.

See our other article on fixing the flickering issue: http://theitbros.com/windows-8-and-photoshop-cs6-black-screen-flickering/

Original Post Here

How to Download Your Entire WordPress Media Library

http://www.wpbeginner.com/plugins/how-to-download-your-entire-wordpress-media-library/

Last updated on by
How to Download Your Entire WordPress Media Library

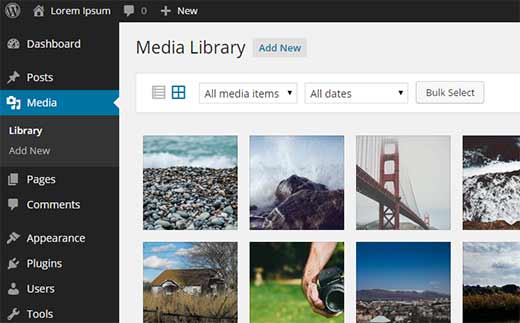
Do you want to download all images and media files from your WordPress media library? You can use a FTP client, but that’s not easy for beginners. In this article, we will show you how to download your WordPress media library without using FTP.

WordPress media library

Video Tutorial

If you don’t like the video or need more instructions, then continue reading.

First thing you need to do is install and activate downML – Download Media Libraryplugin. Upon activation, you will notice a new menu item in your WordPress admin bar labeled ‘downML’.

You need to click on the menu which will prepare a zip file of your WordPress uploads directory and make it available for download.

When your download is ready, you will see a page with the link tomedialibrary.zip file. You can download this file to your computer.

Download page for all your images and media files in one convenient zip file

After downloading the file to your computer, you can extract it to get your entire WordPress media library.

Why & Who Would Want to Download the Media Library?

If you want to store a copy of just your media library in your computer, then this plugin is handy.

You can always use a fully automated WordPress backup solution, and it will backup your entire WordPress site (including plugins, themes, posts, and the media library).

However, most backup plugins do not have an easy way to download just your uploads and media library. This plugin provides a much quicker way to do that.

Another way to download your files is by using an FTP client, but if the user does not have access to the FTP or don’t know how to use it, then this plugin is an easier alternative.

We hope this article helped you download your WordPress media library. You may also want to see our tutorial on how to connect Google Drive to your WordPress media library.

Continue Reading

How to Create a Feather Wipe in Premiere Pro

Have you ever wanted to add a vintage-looking transition to one of your videos? The feathered (gradient) wipe is a great effect that has been used for years.

linear wipe hard

Above you see the ‘wipe’ transition. Below is the ‘linear wipe’ with feathering.

linear wipe feather soft

I’m currently editing a video for UC Berkeley to promote their yearly open house. The promo video’s theme has to do with the over-a-century of science, sports, performance, etc. So I’m combining archival footage with new footage, and the first part of the video is like an old-time newsreel. I wanted to add this feathered wipe effect that I saw in another video that I saw. Luckily Premiere Pro has the right effect to do the job, but it’s not in the area you would imagine.

Below is a written tutorial as well as a video tutorial for you to watch.

Watch the video tutorial below:

Step by step instructions:

  1. With your Premiere Project opened, put the two clips that you want to transition from/to on the timeline.
  2. Put the first clip on track 2 above the second clip.
  3. Find the Linear Wipe effect in your effects bin and drag/drop it onto the first clip (notice that it doesn’t become a traditional transition at the end of the clip).
  4. Go into the Effects Controls panel and expand the Linear Wipe effect. You’ll notice options for Transition Completion, Wipe Angle, and Feather.
  5. Overlap your clips in the timeline so that the second clip is underneath your first clip (see image below for reference). The amount of the overlap will end up being how long your transition is.
  6. Put the Playhead (where you are in the timeline) at the beginning of the second clip.
  7. In Linear Wipe  controls, set the Transition Completion to 0% and click the Stopwatch icon to set a keyframe.
  8. Move the Playhead to the end of the first clip.
  9. Set the Transition Completeness to 100%. This will create another keyframe.
  10. Now scrub through or play the sequence from the beginning of your first clip. You should have a linear wipe effect.
  11. Change the Feather number to whatever pleases you. Depending on the size of your footage, I like between 75-125 for HD footage.
  12. You’re done!

linear wipe effect

There you have it! That’s how to create a soft wipe effect with feathering in Adobe Premiere Pro. It’s not the easiest transition to do, because it takes keyframing. But it is a great effect to use for a bunch of project. I hope you enjoyed this tutorial!

NOTE: You can also change the Angle to change the direction of the wipe (see cool Star Wars wipe below).

Original posthttp://www.videoschoolonline.com/how-to-create-a-feather-wipe-in-premiere-pro/